Hi again!
This time I will share some cool stuff for your Jobifier WordPress theme.
If you search for TinyMCE causing error 500 on WordPress, you will find a tons of results. Many people with certain hosting services already faced this error.
As you know, WordPress post editor (the place when you can type your post content) is used everywhere on Jobifier WordPress theme. It is used when you submit a new job and resume and also when you editing both of them. If the error 500 happened on your site while using Jobifier, it would be a great disadvantage for your job listing site.
On this post, i will share a little tips to avoid the TinyMCE error by adding a new option and new conditional tags. Without the TinyMCE, your site loading speed will be faster and lighter.
To do this modification, you will need to modify 2 files.
Step#1
On this first step you will need to add the option into your theme option. With this modification you can switch on/off the TinyMCE easily. You will need to modify a file named theme-options.php, this file can be found via FTP at directory: wp-content → themes → jobifier → includes.
Open the file and find out this code:
$options[] = array( "name" => __('Multiple Job Type', 'colabsthemes'),
          "desc" => __('Allow job lister to assign multiple job types for job.','colabsthemes'),
          "id" => $shortname."_allow_multiple_jobtype",
          "std" => "false",
          "type" => "checkbox");
Once you find it out, put this code just below it:
$options[] = array( "name" => __("Allow HTML", "colabsthemes" ),
					"desc" => __("Turns on the TinyMCE editor on text area fields and allows the ad owner to use html markup. Other fields do not allow html by default.", "colabsthemes" ),
					"id" => $shortname."_allow_html",
					"std" => "false",
					"type" => "checkbox");
And done! Now you can go to: WordPress dashboard → Jobifier → Dashboard → Job Settings. This option will affecting all TinyMCE functions that available on your site.
Step #2
On this second step you need to implant the option you just made on the first step and adding the conditional option. To do this, you will need to modify a file named theme-custom-fields.php. This file can be found via FTP at directory: wp-content → themes → jobifier → includes.
Open the file and find out this code:
// Textarea Field
    // --------------
    case 'textarea':
			$editor_id = $field->field_name;
      $value = '';
      if ( $field->field_name == 'post_content' ) {
        if($post){
          $value = $post->post_content;
        }
      }else if ( isset($post_meta_val)&& $post_meta_val ) {
        $value = $post_meta_val;
      }else{
				$value = $field->field_values;
			}

      wp_editor( $value, $editor_id,array('textarea_name'=>$field->field_name) );
      break;
Then modify it become:
 // Textarea Field
    // --------------
    case 'textarea':
			$editor_id = $field->field_name;
      $value = '';
      if ( $field->field_name == 'post_content' ) {
        if($post){
          $value = $post->post_content;
        }
      }else if ( isset($post_meta_val)&& $post_meta_val ) {
        $value = $post_meta_val;
      }else{
				$value = $field->field_values;
			}
	  if (get_option ( "colabs_allow_html" ) == 'false') {
		wp_editor( $value, $editor_id,array('textarea_name'=>$field->field_name, 'tinymce' => false) );
	  }else {
		wp_editor( $value, $editor_id,array('textarea_name'=>$field->field_name) );
	  }
      break;
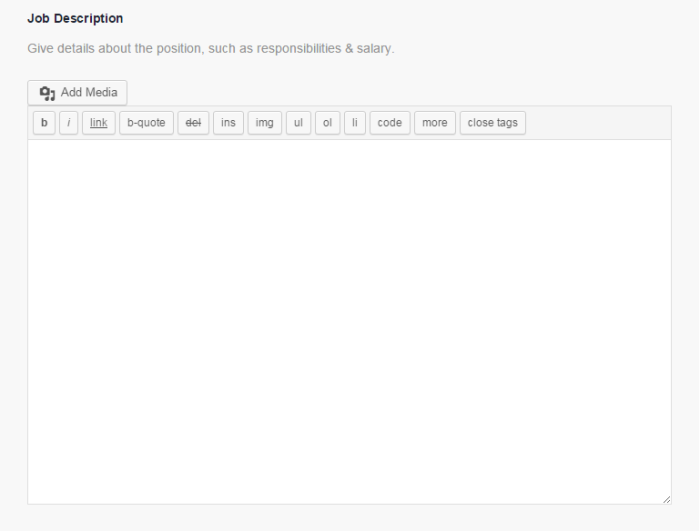
And done! When you disable the TinyMCE, your text area should look like this one:


